My Garage
Cart
Make sure this part fits

Hyundai 24321-25000 Chain-Timing

2005-2015 Hyundai 2432125000

Customer Questions & Expert Answers (5)
24321-25000 Hyundai Chain-Timing Product Photo 1 of 4
  • Part Description
    Chain-Timing
  • Part Code
    24321
  • Manufacturer
    Hyundai
Make sure this part fits
$79.53 MSRP: $111.74
You Save: $32.21 (29%)
Ships in 1-3 Business Days
1
ADD TO CART
  • Related Parts
  • Product Specifications
  • Vehicle Fitment
  • Customer Questions & Expert Answers
  • Product Specifications

    BrandGenuine Hyundai
    Part Code24321
    Manufacturer Part Number24321-25000
    Part DescriptionChain-Timing
    Other NamesTiming Chain
    Item Dimensions4.9 x 4.6 x 1.8 inches
    Item Weight1.20 Pounds
    ConditionNew
    Fitment TypeDirect Replacement
    ManufacturerHyundai
    SKU24321-25000
    WarrantyThis genuine Hyundai part is guaranteed by Hyundai's factory warranty.
    Shipping & ReturnShipping Policy Return Policy
    Warning: California's Proposition 65
  • Vehicle Fitment

    Year Make Model Trim & Engine Important vehicle option details
    2008-2012 Hyundai Genesis CoupeDOHC - TCI/MPICoupe - 2Door 4P
    2009-2012 Hyundai Santa FeDOHC - MPIWagon - 5Door 5P
    2005-2010 Hyundai SonataHigh Grade, Middle Grade|DOHC - MPI4 Door Sedan, Sedan - 4Door 5P
    2011-2015 Hyundai Sonata HybridDOHC - MPISedan - 4Door 5P
    2009-2013 Hyundai TucsonDOHC - MPIWagon - 5Door 5P
  • Customer Questions & Expert Answers

    Q:
    Before I order I would like to verify if this part will fit my vehicle Posted by HyundaiPartsDeal Specialist
    A:
    You can Select Your Vehicle to check if 24321-25000 fits your vehicle.
    Posted by HyundaiPartsDeal Specialist
    Q:
    How to remove and install the Timing Chain and Variable Timing Sprocket on 2010 and later four cylinder Hyundai Santa Fe? Posted by Customer
    A:
    Before beginning the removal of any engine components, ensure that the ignition is turned off and the cable connected to the negative terminal of the battery is detached. In addition, the lug nuts on the right front wheel should be loosened, and the car lifted and the wheel fully removed. Provide TDC compression for the number one cylinder, and then remove the right side of the engine splash shield, on the beauty side support the oil pan using a floor jack and block of wood in order to lessen the weight on the engine mounts. Second, after that, the upper engine mount bracket has to be taken off, water pump pulley bolts need to be slightly loosened and the drivebelt along with the drivebelt tensioner, idler pulley, and the alternator need to be removed. Disconnect the electrical connectors for the ignition coils, pumps fuel injectors, and Camshaft Position sensor and then unfasten the inlet duct to air filter housing and air filter assembly. Move on and take out the water pump pulley, crankshaft pulley and engine mount bracket off the timing chain cover. Lower the air conditioning compressor and its mounting bracket to the body when the engine is supported. Loosely fit the crankshaft pulley into position over the crankshaft to check for TDC; then remove the timing chain cover screws/bolts, and cover, while noting the orientation of the crankshaft key slot relative to TDC and the timing marks on the camshaft sprockets. Press down the timing chain tensioner plunger with a puller, fasten it, and take out the tensioner, timing chain tensioner arm, and chain. Disconnect the timing chain oil jet and crankshaft sprocket, and compress the balance shaft chain tensioner while disposing of the former unit as well as the latter's pins. All the worn and damaged part must be checked, timing chain and balance shaft chain must be replaced, sprockets as well as tensioners should be examined. For assembly, position the crankshaft keyway Together with the balance shaft sprocket groove and the balance shaft module should be positioned, The color link of the chain should also be arranged in matching sprocket marks. Ensure that the colored links and anti-rev mark are properly aligned on the chain sprockets then properly install the chain guide and tensioner arm together with the tensioner. Fit the timing chain sprocket and oil spray nozzle in its respective place to the crankshaft key and the cam shaft sprocket mark must match. Remove all the sealing surfaces, apply the RTV sealant and after that install the timing chain cover and tighten the bolts as recommended. Last but not the least, ensure you fit the crankshaft oil seal and the process should be done in reverse to the way you removed them.
    Posted by HyundaiPartsDeal Specialist
    Q:
    How to remove and install the Timing Chain and Variable Timing Sprocket on 2010 and later V6 Hyundai Santa Fe? Posted by Customer
    A:
    It is as mentioned, timing system; and if one is wrong, irreversible and catastrophic damage occurs to the engine. This procedure can only be done by very experienced personnel and in any case of doubt, an expert opinion should be sought. Review all work for as much as possible affirm that everything is right before the start of the engine. To start, get the AC unit of the car flushed in a certified service center and then remove the battery's negative terminal and the radiator's coolant. Take out the engine cover and the upper hose of the radiator and also loosen the lug nuts of the right front wheel, lift the vehicle using jack and put it on the stand, finally remove the-wheel of the RPM and the splash shields also. Continue and eliminate lower and upper oil pans, coolant reservoir, and prepare for the suspension of the engine from above. Take the upper engine mounts, loose the transaxle mount bolts, and then unbolt the intake manifold with the support bracket. Position number one cylinder to the top dead centre on the compression stroke, un-bolt the valve covers, drive belt, crank shaft pulley, power steering pump and air conditioning compressor and the alternation. Pull off the drivebelt idler pulley, tensioner, and water pump pulley; followed by the timing chain & cover, the bolts should be arranged as they are removed. Check that the No. 1 cylinder is still at TDC, mark the chain by painting or using crayon, compress the right chain tensioner and then, unbolt and lift of the right upper chain guide, tensioner, and the chain. Proceed further by taking out the right chain guide along with the oil pump chain cover, tensioner, chain guide, sprocket, and chain in addition to the crankshaft gear that is destined for the oil pump and right timing chain respectively. Perform again the removal steps on the left timing chain components such as left timing chain crankshaft sprocket and left timing chain tensioner adapter. Closely inspect the timing chain and the sprockets on both the crankshaft and the camshaft and the chain guides and auto tensioners for possible wear. Scrub the front of the engine, check and / or replace the crankshaft oil seal, and align the crankshaft key and camshafts with TDC. Place the timing chain guide in its intended place, then drop the chains over the crankshaft sprocket and tensioner arm, as well as over the upper cam-to-cam guide; be sure that there is no slack. Remove the chain pins from both of the chain tensioners, then place the oil pump chain guide / tensioner, and start the engine clockwise while turning the engine two full revolution to align the timing marks, these entire processes should not pose much resistance. Scrub the sealing surfaces of the timing chain cover, if required use any RTV silicone sealant and place the cover over the dowels in the block and tighten the many timing cover bolts using the recommended torque settings. Complete the reverse order of the removal process, and after road testing to ensure that there are no leaks, recharge the air conditioning system.
    Posted by HyundaiPartsDeal Specialist
    Q:
    What precautions should be taken when performing a timing chain and variable timing sprocket replacement on 2006 and later V6 Hyundai Sonata? Posted by Customer
    A:
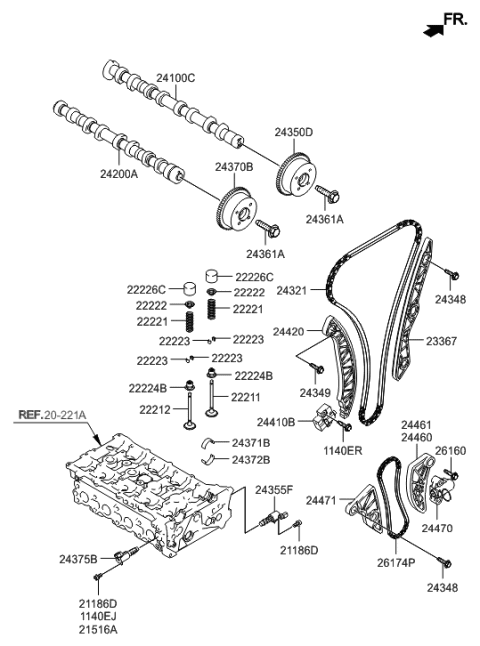
    Caution is advised as the timing system is complex, and mistakes can lead to severe engine damage; only highly experienced individuals should attempt this procedure, and consulting an expert is recommended if there is any uncertainty. Begin by evacuating the air conditioning system at a certified service facility, disconnecting the negative battery terminal, draining the cooling system, and removing the upper radiator hose. Loosen the lug nuts on the right front wheel, raise the vehicle securely on jackstands, and remove the right front wheel along with the plastic splash shields. Proceed to remove the oil pan and coolant reservoir, then support the engine and remove the upper engine mounts and loosen the transaxle mount bolts. Remove the intake manifold and its support bracket, set the number one cylinder to TDC on the compression stroke, and take off the valve covers. Remove the drivebelt, crankshaft pulley, power steering pump, air conditioning compressor, alternator, drivebelt idler pulley, tensioner, and water pump pulley. Take off the timing chain cover, carefully laying out the bolts in order, and verify that the number one cylinder remains at TDC. Paint match marks on the chains where they align with the sprockets, compress the right chain tensioner, and remove the right upper chain guide, tensioner, and chain. Continue by removing the right chain guide, oil pump chain cover, oil pump chain, tensioner, guide, sprocket, and crankshaft gear. Repeat the removal process for the left timing chain components. Inspect all parts for wear and damage, checking the timing chain, sprockets, chain guides, and auto tensioners for any issues, replacing components as necessary. Clean the front of the engine, replace the crankshaft oil seal if needed, and align the camshafts with their TDC marks. Install the timing chain guide, chains over the crankshaft sprocket, tensioner arm, and tensioner, ensuring no slack exists. Pull the pins from both chain tensioners, install the oil pump chain guide and tensioner, then rotate the engine two complete turns clockwise to realign the timing marks, stopping if any resistance is felt. Clean the timing chain cover sealing surfaces, apply RTV silicone sealant where necessary, and install the cover, tightening all bolts to the specified torque values. Finally, reverse the removal process for the remainder of the installation, and after test driving to check for leaks, recharge the air conditioning system.
    Posted by HyundaiPartsDeal Specialist
    Q:
    What should I do with the air filter housing for the 2007 Hyundai Sonata? Posted by Customer
    A:
    Remove the air filter housing inlet duct and the air filter assembly. For 2.0L models, also remove the intercooler inlet and outlet pipes.
    Posted by HyundaiPartsDeal Specialist
    See expert answers on similar Timing Chain
    If you have any questions about this product, please don't hesitate to ask us. We will be happy to help you!

Genuine Hyundai Part 24321-25000, your Right Choice

Select the OEM Part #24321-25000 Chain-Timing. It can be referred to as Timing Chain. This part is compatible with 2008-2012 Genesis Coupe, 2009-2012 Santa Fe, 2005-2010 Sonata, 2009-2013 Tucson. Premium OEM quality parts improve performance and extend the life of your vehicle. They undergo strict quality checks and are built to Hyundai's factory specifications for proper installation.

HyundaiPartsDeal.com is a top provider of genuine Hyundai components and accessories. Looking for budget-friendly Hyundai OEM parts? Your search ends here with our wide range of genuine Hyundai products. Our economically priced parts come with the manufacturer's warranty to make sure you get your money's worth. Experience a smooth shopping journey with our fast delivery and easy return policy.

Why choose Hyundai Parts Deal

  • Dedicated Service

    Your complete satisfaction is our #1 goal

  • Lowest Prices

    Best deals on genuine OE parts from dealerships

  • Fast Delivery

    Orders are processed and delivered promptly